| HOME | PICTURES | RAKU MAIN PAGE | ||||||||||||||||||
 Lakeside Pottery Raku Workshop Guide Lakeside Pottery Raku Workshop Guide
Version 2.0 Morty Bachar - E-mail us |
||||||||||||||||||||
|
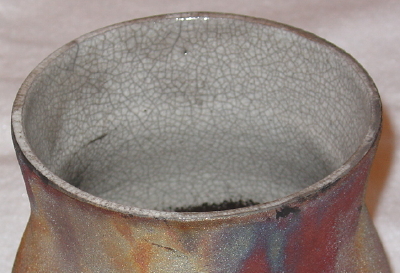
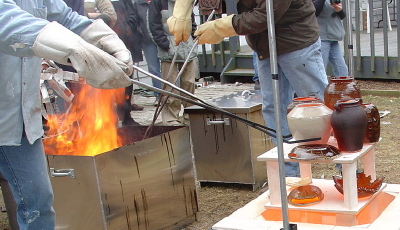
________________________________________________________________________________________________ Table of Content History of Raku: The making of Raku ware was initiated by Chojiro, the first generation of the Raku family, during the Momoyama period (1573-1615). At this time three-colored glazed pottery (san cai) based on technology from the Fujian region of China was produced in and around Kyoto. Chojiro is thought to have been familiar with such techniques. A written record confirms that Ameya, Chojiro's father, originally from China, is thought to have been the person who introduced the techniques of three-colored glazed pottery from China, although none of his works has survived to prove this. These Japanese san cai wares were not, however, called Raku ware and it was only after Chojiro had become acquainted with the teamaster Sen no Rikyu (1522-1591) and had started making tea bowls for the tea ceremony (chanoyu) that Raku ware came into being. It could be said that the origin of Raku ware lay in the making of a single tea bowl for the tea ceremony. Current process of Raku: Pots are fired to 1800F degrees. At that time, the pots are carefully removed, with long tongs, and placed in a special paper lined metal can. Then, the heat from the piece ignites the paper, causing a reaction in Oxygen with the copper in the glaze. The result is a wide range of colors on the surface of the pots. A lid is then quickly put over the metal can, and the ware is allowed to cool for 30 – 60 minutes or longer in the reduction atmosphere. The pots are then removed from the can and the beautiful colors, luster, and patterns are revealed. Raku pieces will not hold water and to be used only as a decorative art form. |
||||||||||||||||||||
|
Clay: Use clay that is suitable for Raku (e.g., with grog). Here at Lakeside Pottery we used Baldwin 192 made by Standard and can be purchased for NY/NJ Ceramic Supply (800-7CERAMIC - ext 202). Bisqued pots: Students will bring their own bisqued pots. To prevent possible cracking, pots need to be well made (uniform thickness) and avoid flat forms. Size Requirements: Pots should be no wider than 8" and no taller than 14". Number of pots: A maximum of 8 pieces per student - if time permits, will fire extras. Safety is where most attention is required. |
||||||||||||||||||||
|
a) Apply the same rules as in regular glazing |
||||||||||||||||||||
 |
||||||||||||||||||||
|
||||||||||||||||||||
|
The propose of the reduction chamber ("can") is to generate live and strong fire around the pots that were just removed from the kiln and then have the flames suffocate by covering the chamber tightly. The fire is now starved for Oxygen and therefore is taking it from the glazes on the surface of the pots. How much oxygen was taken and at what temperature determines the color effect. For example, if a Copper Oxide glaze is used (green) and all the Oxygen was removed, Copper Oxide will turn to pure copper and where it did not, it will stay green. There are so many factors that go into how your piece will turn out: how fast you reach temperature in the kiln, the temperature you pull at, the temperature outside that day, how fast you go into the can, how fast the paper ignites, how long you hold the pots in the flames before you set it down, and how quickly you get the flames out when you put the lid on the can. By letting the pots cool as you bring it from the kiln will make the colors lighter the longer it cools. .....a) Line up the reduction chamber with organic material (e.g., newspaper, leaves, straw) .....b) Remove the pots with tangs from the kiln and go into the can slowly getting the fire started .....c) Move the pots through the flames but without touching the sides or one each other and place on the bottom .....d) Close the lid with a tight fit. Don't pop the lid open once closed. If you do pop the lid to allow some air .....e) Let your pieces totally cool in the can for at least 30 minutes (longer for thick / heavy pieces). The color
6) Removing From Reduction Chamber and Cooling Off a) Remove pots with tangs and place on a platform until it cools of to approx. 300F. b) At 180F, the pot can be rinsed in water and cleaned with a stiff brush. c) After you have rinsed the piece, dry it to set and hold the colors. If the piece remains damp the color will start to fade right away. d) If you are not going to show or sell the piece, when you get home, put it in a plastic bag store it. Raku should never be left out in the sun and it does best in a cool dry place. Raku pieces will not hold water and to be used only as a decorative art form ____________________________________________________________________________________________ Appendix A - Firing StagesInitial Kiln Drying fire that hot; we stop at the point where we have just enough fusion and hardness for durability, but not too much so we cause melting or deformation of the ware. This point is called the maturing of the clay. ____________________________________________________________________________________________ |
||||||||||||||||||||
| COPYRIGHT Lakeside Pottery LLC ; COPYRIGHT details and linking policy; |

